Settings & sources
Introduction
At this point you’ve likely set up your Shopify store, added the Hurdle app and maybe thinking ‘Now what?’. Building out your storefront can feel a little daunting at first, but this guide is here to help you!
Basic settings to get you started
The Shopify Help Centre is a great source of information when you’re starting to build out your storefront. We’ve compiled a list of handy links to help make things a little easier:
- Online Store Help
https://help.shopify.com/en/manual/online-store - Choose a theme
https://help.shopify.com/en/manual/online-store/themes - Add your company logo & colours
https://help.shopify.com/en/manual/promoting-marketing/managing-brand-assets
Adding important documents
To ensure your end users have access to your policies you will need to add these documents to your account. If you do not currently have certain policies written, Shopify does provide some templates to get you started. To add your policies:
- From your Shopify admin, go to Settings > Policies.
- Enter your store policies, or click Create from template to enter the default template. Use the rich text editor to add style and formatting to your policies, and to add links and images.
- Review your policies and make any changes.
- Click Save to add your policies.
There are several ways to make these documents accessible on your page, some suggestions are below:
- Add links to the Footer - Sales Channels > Online store > Navigation > Footer Menu > Add Menu Item
- Add to a ‘Help Centre’ Page - Sales Channels > Online store > Pages > Add Page
🔗
https://help.shopify.com/en/manual/checkout-settings/refund-privacy-tos
https://help.shopify.com/en/manual/online-store/themes/theme-structure/pages
Giving Hurdle Access to your account
It’s important that we can have access to your account if there are any issues we need to investigate.
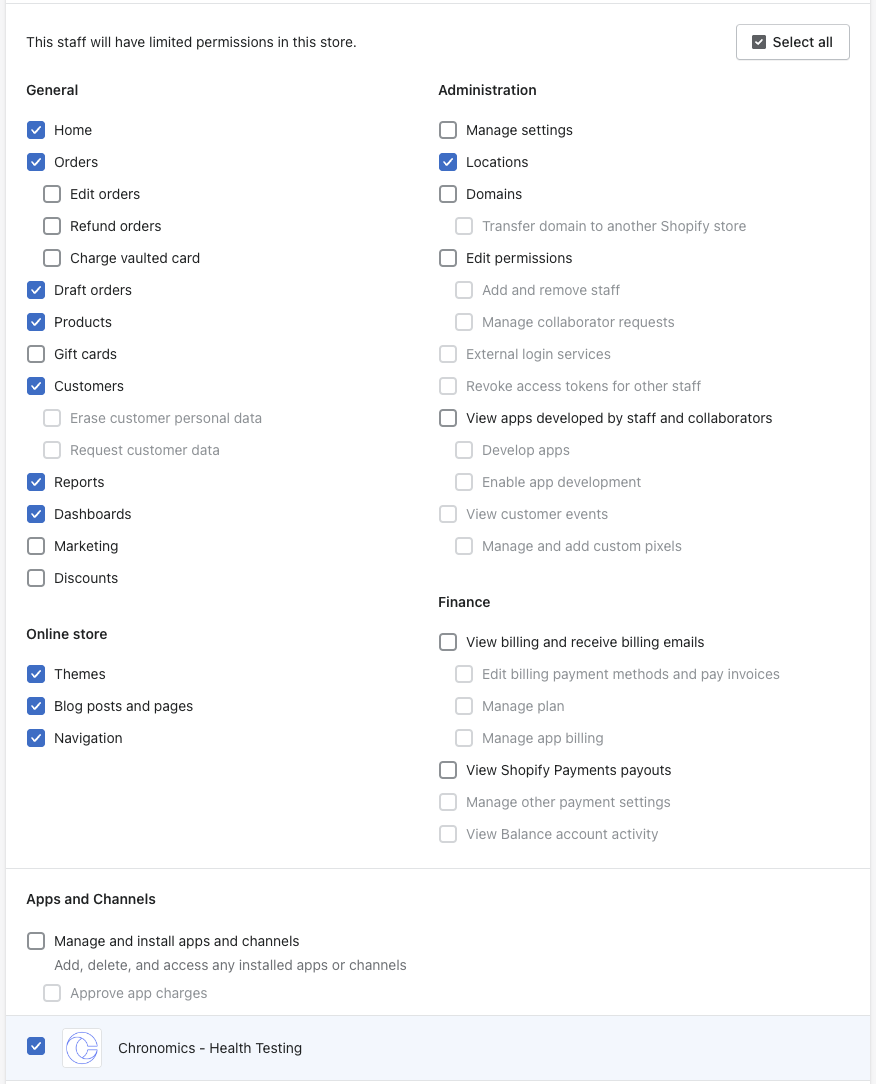
To do this please add your Hurdle success manager as a staff member within the settings.
Steps:
- From your Shopify admin, click Settings > Users and permissions.
- Click Add staff.
- Enter the staff members's full name and their email address.
- Do either of the following:
- Select which permissions you want to give the staff member. As a minimum we would recommend : General, Online Store and Locations
- To give the staff member all available permissions, select Select all.
- Click Send invite.
🔗
https://help.shopify.com/en/manual/your-account/staff-accounts/create-staff-accounts

Updated 5 months ago
